
How To Waterproof A Quilt
Ah, summertime at the soccer fields!
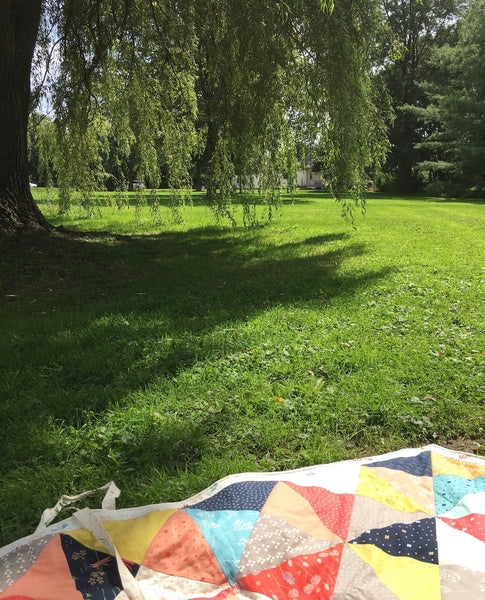
A couple of summers ago I made myself a waterproof quilt because I was spending many evenings every week at the soccer fields with my kids. While bringing folding chairs was an ok option, I kept forgetting to pack them when we had to leave in a hurry. So I decided I was going to make a quilt that I could carry around easily and leave in the car all the time. A couple of damp practices later, I decided that it needed to be a *waterproof* quilt.
This post contains affiliate links. I may receive a commission for purchases made through these links at no extra cost to you.

This hourglass quilt pattern is featured in Make Modern's issue 27, and includes the pattern for the quilt top and as well as the tutorial for the waterproofing.
You can get the issue or a subscription here, like their awesome All Access Subscription that gives you access to everything ever published by Make Modern. Which means all of my published patterns are in there, too... hint, hint ;-)
If you have a different quilt top you'd like to turn into a waterproof picnic blanket, read on to see how it's done.

There are two key points when making a quilt waterproof.
First, you need to source your backing fabric before you decide on a pattern for the front. There are many options for backing fabrics available, but you can't piece a backing together because it will let damp seep through along the seam. So, whatever fabric you choose, that is the maximum size you will be able to make your quilt.
Get creative when sourcing the backing fabric. There is the obvious option of oilcloth, but it can be very stiff. I used plastic-covered fabric from Ikea, and there are plastic-covered table cloths you can buy off the roll at hardware stores, or pre-cut in the home goods section of some box stores. Stay away from the really thin vinyl picnic table cloths from discount places, though. Those work well to sew on, but they, unfortunately, get brittle and start chipping and flaking after a short while, especially along folds. For an unconventional option, check out shower curtains. They have the advantage of being quite wide, so you can get a good-sized quilt with one of those.
And second, do not stitch through the backing. Any thread that comes in contact with the ground will wick moisture up along it, and if you quilt through the backing like you would on a normal quilt, you're creating a whole bunch of holes in your waterproof fabric with wicks running right up through the quilt to the top, resulting in you getting a damp bottom.
Instead, you will quilt your top to your batting only and then attach the backing afterwards. It makes the blanket a bit more "shifty" in the wash, but as long as the batting and top are securely quilted, it really is not an issue.

Are you ready to waterproof your quilt?
1. Start with a backing fabric of your choice, and decide on a pattern for the quilt top that will end up having the same measurements as the backing. You will be using a 1/2" seam allowance when assembling the top and backing, so it's best to choose a pattern with a border. If you have a design going right to the edge, you will be cutting some of it off since patterns usually assume you are using a 1/4" seam only.
2. Make your quilt top, then cut the batting to 2" bigger on all sides than your top.
3. Lay your quilt top on top of the batting, right side up, and baste using your favourite method. Quilt the top and batting as desired and staystitch around the outside 1/4" from the edge. Trim the batting to be even with the top. If your quilt is smaller than your backing, trim the backing to the same size as well.
4. Lay your quilted top on the floor with the top facing you (batting down), and lay your backing on top, right sides together. Pin in place, then stitch around the outside of the quilt with a 1/2" seam allowance, leaving about 15" open for turning. Backstitch at the beginning and end. Trim the corners to make turning easier, but be careful not to cut too close to the stitching.
5. Turn your quilt sandwich right side out, carefully poking out the corners. Then fold the raw edges of the opening in and pin the opening closed. Topstitch around the quilt with a 1/4" seam, closing the opening and giving the quilt a crisp edge.

6. Grab a glass of something delicious and a good book, and go enjoy some sunshine on your new waterproof picnic quilt!
If you want to attach straps and handles to the quilt or use the same pattern I did, you can get a copy of Make Modern magazine's issue 27 right here with all the detailed instructions.
Share your makes on Instagram and tag me @pennyspoolquilts, I'd love to see it!
Thanks for sharing that idea Grace, I think that could be really useful to repurpose an already made quilt, because a pocket could be stitched on after the quilt is already finished. And it could be used to keep some items secure while the shower liner is in use.
I think I will make a pocket and insert a clear shower liner with some binder clips…just lie that down, put the quilt down and clip it if it’s damp out.
That is a brilliant idea, Terry! Thanks for sharing!
I made a beach quilt with PUL backing. I inserted a secret pocket with velcro between the backing and top for keys and ID while swimming.
What a great idea! Thank for sharing :-)