
6 Tips For Keeping Your Studio Tidy - Spring Cleaners 2021 Blog Hop
I'm taking part in the Spring Clean Your Studio blog hop this year, and showing you some tips and tricks I use to keep my studio space clean and organized.
Officially, the blog hop is meant to show our sewing spaces before and after a big clean up. However, because I have a fairly small space, I have to be quite diligent in keeping it clean and tidy or I'm not able to work. There are no spare surfaces to dump stuff, my sewing table doubles as my desk, and everything has to be easily movable because one wall of the studio is taken up by a queen-size Murphy bed that needs to be able to come down if needed (but it does excellent double duty as a design wall when it's not in use). So, before and after photos would be rather anticlimactic. Instead, I've decided to talk a little about how I keep things neat and tidy around here.
I am a naturally (or rather, raised that way) tidy person, and messes give me the heebie-jeebies. Strangely, someone else's mess doesn't bother me, but a mess in my house does ;-) It takes my focus away from my work, so if I want to be creative and design and sew, I need the physical space to be decluttered so my mental space can do the same.
This is the biggest sewing room I've ever had. I started, like many, as a kitchen table quilter. Fabrics in a bin, sewing machine packed away every night. Then I moved a sewing table into the playroom, so I was able to leave the machine set up, but still had fabrics in plastic totes and with inquisitive small kids around, anything unsafe (like my cutters) needed to be put away after every use.
After that, I moved to a small spare bedroom in our last house. I could leave a couple more things lying around if I needed to. The kids were a bit older by then, and it had a door. And I got some shelving space. I moved our books around so that three cubbies in our Ikea Expedit unit were free for me to store some fat quarters and a tiny bit of yardage.
And almost 5 years ago, we built and moved into this house. One thing we knew from the start was that we would have a dedicated guest bedroom/sewing studio. I have family overseas, so finding a place for them to stay had always involved a bit of shuffling things around. Now that we were building a house from scratch, we could plan that in.
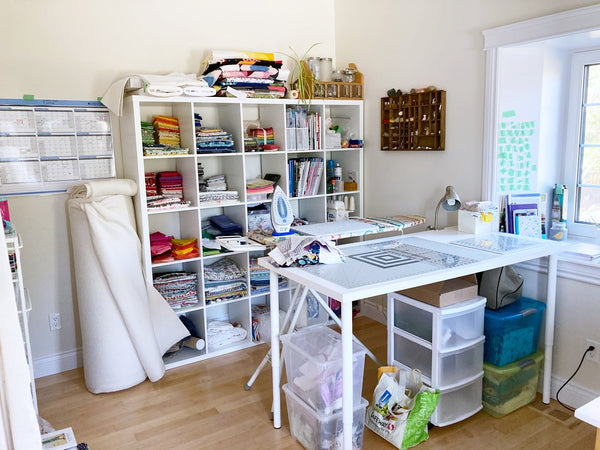
So now I have a whole 10ft by 14ft room and an entire Expedit unit all to myself (if you ignore the Murphy bed). But, as they say, with bigger sewing rooms come bigger organizing responsibilities (or something like that). Of course, projects accumulate on the cutting table, fabrics and cutters stay on the table while I'm in the middle of a project, the ironing piles up on the ironing board for a while until I get to it, and papers and ideas float around and get the "I'll just put that here for now" treatment until it annoys me enough that I go through and sort and tidy. But overall, it stays tidy enough that I never have to spend a whole day, or multiple days, putting it all back in order.
So, to get to the point, how do I keep it organized? The short answer is systems. I use systems to streamline processes while I work (I do need to work on finding better ones for business tasks, though) and systems for keeping both myself and my stuff organized.
1 Keep ideas in one place
First off, write down all your ideas in a dedicated notebook or planner, or if you are a jotter, keep all the little notes and old envelopes with your ideas scribbled on in a dedicated place. I have a few notebooks I use for ideas, doing quilt maths, and taking notes in classes, and I use a quilt planner to keep all my quilt ideas in one place. I use the Plan to Quilt planner and love it. It's beautiful on the outside, and well organized inside. I plan most of my quilts on the computer in EQ8, but once a project is coming together, it goes into the planner as both an easy reference, and a memento to look back on later. I wrote a review of the Plan to Quilt planner a little while back. You can find that blog post here, along with a discount code if you'd like to get your own.

2 Sort and edit fabrics
Having limited space means I have to edit my fabric stash regularly. I try to only buy what I need, and while I succeed most of the time, I do have a small stash. The advantage of a smaller stash, aside from requiring less room and being less likely to be a mess, is that I am also less likely to have fabrics I no longer like. Most of what's on the shelf is recent enough that it still reflects my current taste and style.
But, I also edit regularly. Earlier in the year, I went through my fabrics and sorted them. I had noticed that some colours were very sparse on my shelf, and others, while I had plenty of it, I still ended up buying more because I didn't actually like the prints I did have. Or they didn't work for the project. So I pulled each cubby's worth of fabrics out and got rid of anything I knew I wasn't going to ever use. Some of those fabrics had come in bundles and I liked the rest of the bundle, but not this one print. Or I had bought them thinking they were pretty, but later realized that while I still think them pretty, a yellow print with purple flowers on it was never going to be useful to me because I work mostly with tone-on-tone prints. Or at least less garish combinations ;-)
Everything I kept, I folded into two stacks. Fat quarters and the likes got folded up small like at the stores, half yards and bigger got a bigger footprint. This helps me to know at a glance what I have, and I don't have to look through the entire blue stack to see if I have enough yardage of something.

All the fabrics I no longer want to keep are currently sitting in a small pile at the bottom of my design wall, until I decide whether to go through the trouble of photographing them for a destash, or just donating them to my guild for their annual auction.
3 Keep your tools handy
This one is important in any space. I like to call it "A place for everything and everything in its place". I have 1 basket of sewing tools I use frequently. It holds seam rippers, scissors, hera marker, fabric pencils, thread snips, rotary cutter, pins, you name it, it's in there. And when I'm done, things go back in there. It's sitting in the middle of the windowsill below.

Same with my thread. I have a handy three-drawer organizer that fits my threads perfectly and that sits on my sewing table (behind the garbage can I have to keep on the table so the dog doesn't eat the fabric scraps, ugh). I don't have the wall space for a thread peg rack, which would be my dream, so this is the next best thing. They're sorted by brand, and it even fits my case of extra bobbins, although that often ends up sitting on top of the organizer.
Rulers are stored beside my machine on the shelf in my sewing table. My dad built me my sewing table to fit my machine, and the shelf was planned to be large enough to hold my small cutting mat and all my rulers. The 8.5" x 24" ruler often just stays on the cutting table, but everything else goes on the shelf so I always know where they are.

And clear plastic bins....lots of them. There's some for ribbons, one for baggies, another one has velcro and other notions, I have a felt bin, a serger thread bin, and all my scrap bins. I label everything with a piece of masking tape and a sharpie for easy reference, they are all stored in the extra shelving on top of the murphy bed.

4 Deal with your scraps
I used to put my scraps into clear bins sorted by colour thinking that would help me if I wanted to make a scrappy quilt. I could just grab the colour bin I needed and off I'd go. In theory, that sounds great. In practice, it turned out that I did not use them because I couldn't tell if any one scrap was large enough to cut what I needed from it, and on top of that they were all scrunched up and wrinkled from being shoved into a bin and sitting there for months. So for a scrappy project, I ended up pulling out everything I thought was large enough, ironing all the scraps, then getting the ruler out to see if they were indeed the size I needed. Half the time, it was a quarter inch short and I had to go back through the bin to pull out another scrap to replace it with.
Then one of my coworkers at the quilt shop told me how she cuts all her scraps into pre-defined sized squares before putting them away in the bins. Before being the key word here. All her scrap bins contained neatly stacked squares and strips of certain sizes she knew she would be able to use. It was an epiphany moment for me. I literally went home from work that day and started pulling out some scraps to start cutting. That was about 3 years ago now, and I have cut up about 75% of my previous scraps. I now have 5 boxes of homemade precuts that I know are sizes I can use.

And I have to say I love dipping into these boxes. I've made many of my scrap quilts (such as the Scrappy Love quilts, my Swirl pillow, the blue and peach Tumbled Love runner, and my Plaid-ish quilt) entirely from my scrap bins. Total game changer.
If you'd like to read more about that method, I have a blog post about precutting your scraps here.

So, now that I know how awesome it is to have those boxes of homemade precuts, I keep a very small 5.5" x 5.5" x 5" box on my cutting table to put remnants in. Whenever it starts to overflow, I take a couple of hours on a Sunday afternoon and cut them up, so it never gets as overwhelming again as those big bins of randomly sized, colour-coordinated scraps were.
5 Stay on top of WIPs
Works in Progress (WIPs) can get out of hand fast. I have a serious case of "shiny object syndrome" and start new things before old ones are finished. A couple of years ago, on one of my fabric editing days, I came across a project I had totally forgotten about. It had been placed, originally, on top of the stack of fabrics I was going to use for it, but then somewhere in there, it ended up in the stack. As I pulled out the other WIPs from the spot where they actually were supposed to be kept, and a few orphan blocks appeared that I had also forgotten about, I realized I needed a better system to keep track of these projects. So I got this handy basket tower from Ikea. There are 6 basket drawers and I keep my WIPs sorted in them by priority. I also keep some fabrics together that way even if I haven't started actually working on an idea, and it keeps me from accidentally using them in something else.

6 Put stuff where it belongs
A small but important trick. Whatever I pull out, I make sure it goes where it belongs when I'm done. Either back to where it came from, or into a WIP drawer, or onto the pile of things to be donated etc. While "I'll just put this here for now" is super tempting (and I do it often) it can quickly spiral out of hand. If it takes less time to put it where it goes than it does to think why I'm going to put it "here for now", I put it away. If the WIP drawer I'm putting it into needs an edit, I can get to that when I have more time. But this way, this current project is already in with its companions, so my edit will be easier to manage.
And there you have it. I hope you find some of these tips helpful if you struggle with keeping the mess at bay. And if you have any systems or tips and tricks you use to keep your space organized, I'd love to hear about them. You can drop me a message in the comments below.

This blog hop is hosted by Cheryl Sleboda of muppin.com and is an annual event. To see all the blog posts in this hop, just click below.
- March 29 - Raylee Bielenberg - http://sunflowerstitcheries.com
- March 30 - Jen Frost - https://faithandfabricdesign.com
- March 31 - Tara Gebhardt - https://quiltspluslove.com/quilt-stories
- April 1 - Becca Fenstermaker - http://prettypiney.com/blog
- April 2 - Leanne Parsons - http://www.devotedquilter.com
- April 3 - Rebecca Lidstrom - http://Www.studiorquilts.com/blog
- April 4 - Amy Bradley - http://purplepineapplestudio.com
- April 5 - Sue Griffiths - https://www.duckcreekmountainquilting.com
- April 6 - Kate Starcher - http://katiemaequilts.com/blog
- April 7 - Tammy Silvers - https://tamarinis.typepad.com/
- April 8 - Jessica Caldwell - http://Www.desertbloomquilting.com
- April 9 - Monika Henry - https://www.pennyspoolquilts.com/blogs/news
- April 10 - Sara D Flynn - https://www.offbeatquilts.com/blog
- April 11 - Bobbie Gentili - http://geekybobbin.com
- April 12 - Cheryl Sleboda - http://blog.Muppin.com
Hi Debby, I cut 2.5" and 3" squares because the 3" ones can make HSTs that fit with the 2.5" squares. Then 4" and 5" squares (same reason again with the HSTs, but in this instance the 3", 4" and 5" squares can all work together depending what finished size I want), and random width 6" strips. Anything bigger than 2.5″ × 6″ stays whole in case I need to cut bigger squares for something, or rectangles, or sashing etc. I hope this helps.
Hi Claudia, it’s definitely more challenging to keep a small room workable. Reusing boxes and bins is a great idea. My favourites for that are tins. I use some mustard and paprika tins to hold my pens, a couple of sweets tins for pins, and some larger After Eights ones to corral serger accesories and knitting needles.
Love this breakdown! I have a tiny sewing room (it’s a loft space too, so the walls are steeply angled, making furniture difficult) but I’m grateful to have it. I’m still learning what works for me in sewing, and trying to reuse things for bins and boxes instead of buying new. I have started cutting up odd scraps into precut sizes- mostly 2.5 and 1.5 inch wide strips right now.
If be interested to know what sizes you cut your scraps to. I know this depends a lot on the types of projects you normally do, but I’m considering doing the same with my scraps and it would help to know what you find most useful. Thanks!