
Ice Cream Tote Tutorial
Here’s a fun, quick tutorial showing you how to turn two quilt blocks into a stylish tote.

My blog posts sometimes contain affiliate links. If you make a purchase using a link, I may get a commission, at no extra cost to you. To read more about my use of affiliate links, click here.
This is an easy, no-fuss tote with a lining and a small inside pocket for a library card, credit card or similar. It’s a quick and fun way to use up some quilt blocks you want to show off, like the Ice Cream Sunday blocks I used for these totes. But feel free to add additional inside pockets, or a magnetic closure at the top, or any number of other additions that would suit your use of the tote better.

Materials needed for this tote are:
- 2 quilt blocks
- batting for the blocks (this is a great project for Frankenbatting!)
- fabric to make the blocks larger if needed
- twill tape, or fabric to make the handles
- lining fabric
- pocket fabric
- lightweight interfacing (optional) for the handles

First off, start by deciding how big you want your tote to be. I wanted mine about 12″ x 15″, which is a good size for my daughter, who I made the tote for, and I had 12″ blocks to work with, so not much additional fabric was needed.
If your tote size is bigger than the quilt blocks you have, start by adding extra fabric to the blocks to make them the size you need.
I needed 3 extra inches in length, so decided to use a contrasting strip of fabric at the bottom of the tote.

In my case, I cut 2 strips 12.5″ x 3.5″ from the contrasting fabric, and sewed them to the bottom of each block.

Then I spray basted each of the blocks to a piece of batting and quilted it (without any backing, just the block and batting) with a 2″ diagonal grid. I use a Hera marker to mark my quilting lines, but a dull butter knife or masking tape would do the trick, too. Or simply do an overall free-motion stipple that doesn’t require any marking.


Trim off the extra batting and make sure both quilted panels are the same size.

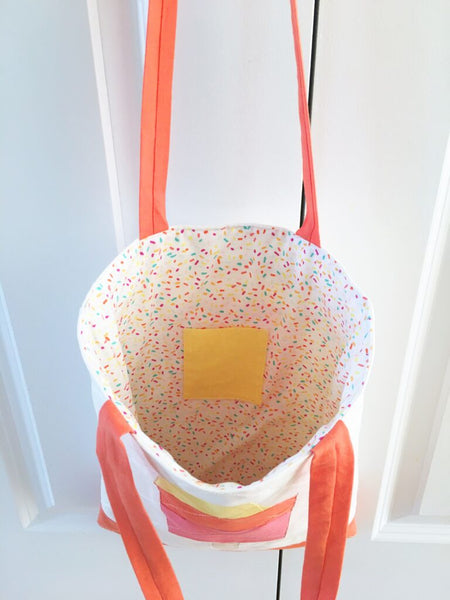
Cut two pieces of lining fabric the same size as the quilted blocks. In my example, I cut two pieces of the Sprinkles fabric 12.5″ x 15.5″.

If you are making an inside pocket, you’ll need to cut this out as well. I used another contrasting fabric (yellow) from the popsicle for my pocket. You’ll be folding this piece of fabric in half to make the pocket. To get the measurements, add 1/2″ to the width you’d like your pocket to be, and double the height you want and add 1/2″. I cut mine 7.5″ x 3.5″, for a 3.5″ x 3″ pocket.

Fold this piece in half width-wise, right sides together, and stitch around the three open sides, leaving an opening for turning. You don’t need to stitch along the fold. Trim off the corners, turn right sides out and give it a good press.

Now topstitch along the fold only.

Place the pocket on one of the lining pieces with the topstitched edge towards the top of the tote. It can help to mark the center of the lining piece and the center of the pocket with a crease, and line up those creases before sewing.

Stitch it to the lining piece by topstitching around the remaining three sides (this will also close the opening you had for turning), backstitching at the beginning and end to make sure the pocket doesn’t come loose.

Place the two lining pieces right sides together, secure with clips (I like Clover Wonder Clips) or pins, and sew a 1/4″ seam around the sides and bottom, leaving the top open. Trim off the bottom corners and leave inside out.

Place the two quilted blocks right sides together, clip or pin together, and sew a 1/4″ seam around the sides and bottom as well, leaving the top open again. Trim off the corners, too, and turn it right sides out.

If you are using twill tape for the straps, you can skip the next step and simply cut the tape to the length you’d like your straps to be, plus 1/2″. If not, now’s the time to make them. Measure how long you’d like the straps to be, then cut two pieces of your strap fabric 2.5″ wide by the length you measured, plus 1/2″ (in my case it’s 26″ x 2.5″). You can use interfacing here if you like stiffer straps. I decided against it and find that they’re quite sturdy enough.
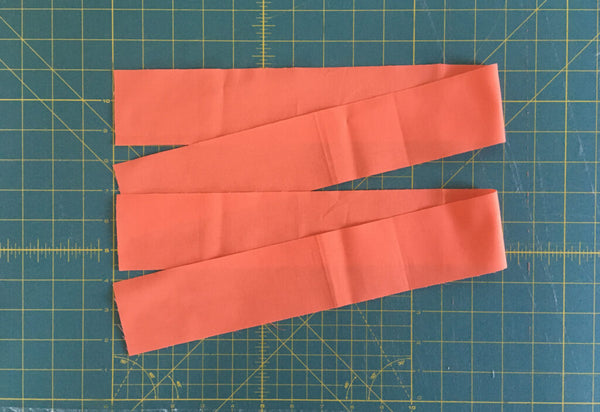
Fold your strap fabric in half lengthwise, right sides together. Press to get a crisp fold. Sew with a 1/4″ seam along the raw edge to form a tube, leaving both ends open.

Turn right sides out. I use a hemostat my vet tech sister-in-law got me, but a bodkin or tweezers work, too. Press it so that the seam ends up in the middle of the strap, not along the edge. Repeat with the second strap.

Now it’s time to assemble the tote.

Take your quilted exterior and measure where you would like to place your handles. Pin the ends of the straps to the top of the exterior, raw edges lining up, in the same spot on both sides of the tote.

It’s a good idea to quickly stitch these in place with a 1/8″ seam to make sure they don’t move when you go to assemble the whole thing, and it adds a bit of extra sturdiness to the handles.

Next, place your tote exterior with the attached handles inside the lining with the raw edges lining up. Make sure you left the lining inside out, so that the exterior and interior are now right sides together. Tuck the handles inside between the two layers. If you have a preference for where the interior pocket goes, make sure it faces the side of the exterior that it will be up against (inside) once it’s assembled. In my case the pocket was facing the whole popsicle, and is now on that side inside the tote.

Line up the two side seams and start pinning or clipping the lining and exterior along the top. Sew around the top edge with a 1/4″ seam, leaving a generous opening for turning, and backstitch at the start and end.

Turn the tote right side out through the opening, and gently poke out the corners. Give the top edge a good press and pin or clip the opening closed.

Sew around the top edge with a 1/8″ seam allowance to close the opening and topstitch for a pretty, crisp look.

There you have it, a simple quilted tote. If you’d like to make an ice cream tote yourself, the block patterns are in my shop.

Please tag me on Instagram @pennyspoolquilts if you share a picture of your tote, I’d love to see it!
Here are a few more images of both totes, inside and out, to inspire you.

Both lining fabrics are from the Boardwalk Delights collection by Art Gallery Fabrics.


Very easy to follow instructions! Thanks for sharing ❤️