
Quilt 101 - How To Machine Bind A Quilt
Quilt binding can be attached in many different ways, and many quilters have very strong opinions about which way is the right way. I prefer to think of it not as "the right way overall", but "the right way for this particular project", because sometimes you have the time and leisure to hand stitch the binding with tiny invisible stitches, and sometimes a quilt calls for big, decorative stitches in a bold colour to add another design element and texture. And sometimes a quilt needs to be bound by machine completely*.

So, if you've tried machine binding but don't like all the pinning, and the not seeing what's going on underneath and "am I even catching it all?" worries, and ending up with a big flap on the edge of the binding because you inadvertently didn't stitch close enough to the edge of the binding strip, let me show you an easy, nearly pin-free way to get a crisp, tidy machine-sewn quilt binding. It even includes mitered corners :-)
(* when I talk about binding by machine or by hand, I always mean the second step of folding the binding over the edge of the quilt and securing it, since the first step is almost always done by machine, even when "binding by hand")
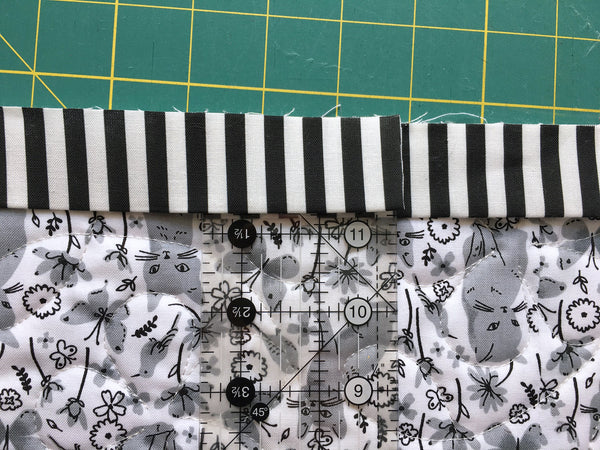
First off, when you attach binding by machine, you will always have an extra visible line of stitching that you don't have when binding by hand. You can see this in the picture below, there is a stitching line running along the top binding strip.

Determine which side of your quilt you want that line to be on, because that will be the side you start with. So if you want that line to show up on the back, you start by attaching the binding on the back of the quilt.
Pick one of the long sides of your quilt and line up the raw edges of the binding strip with the raw edges of the quilt, just on that side. You can hold it in place with a few pins or clips. Start sewing about 10" away from the beginning of the binding strip and sew a 1/4" from the raw edges, backstitching at the start. You want to leave the 10" loose because you will have to join the strips at the end, when you get back around to where you started. Start sewing and head towards the first corner.

Once you get to the corner, stop 1/4" before the edge with the needled down in the fabric, lift the presser foot and turn the quilt so you sew towards the corner. Drop the foot again and stitch diagonally into the corner. Lift your presser foot, and turn the quilt. You can cut the thread if you like, or leave it.


Now fold up the loose end of the strip at a right angle, then fold it back down so the raw edge lines up with the next edge of the quilt and you have a little folded triangle underneath.

Run your fingernail along the fold in the corner to give yourself a crease mark for where to start sewing again.

Line up your needled 1/4" from the top and side edges (this should be right on the crease). Backstitch at the beginning, then sew along to the next corner and repeat these steps. Stop sewing about 10" - 20" away from where you started and backstitch. You'll need more room if you have a big quilt, and can do with less on a smaller quilt.

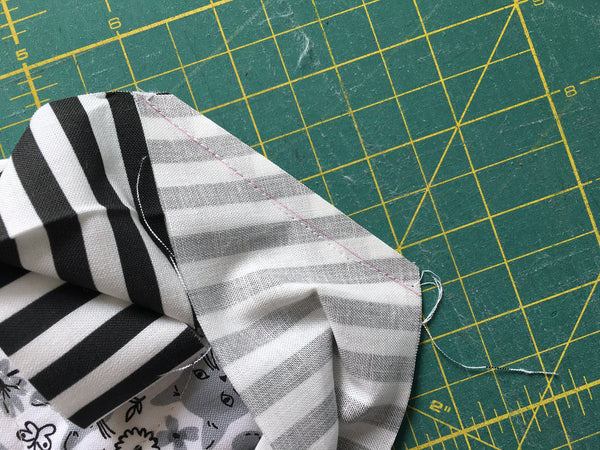
Put your quilt on your cutting surface, binding side facing you. You'll have your two loose ends of binding going over the last bit of quilt edge that is not yet stitched. Please excuse the different fabrics, I had to retake these pictures with a different quilt :-)

Cut the right strip off so it reaches just a bit more than halfway across the open space. Use a ruler and line it up so you are measuring the width of the binding strip from this newly cut edge. I use 2 1/2" wide binding, so I am measuring 2 1/2" of overlap, but if your binding is only 2 1/4" wide, you would measure a 2 1/4" overlap.
Now fold your left strip end over top of the ruler and cut it off so it overlaps the strip below by 2 1/2".

Open both strips and put them right sides together. Being right-handed, I open the left strip and lay it horizontal with the right side facing up. Then I take the right strip and fold and smoosh the quilt a bit underneath so I can put that right strip perpendicular to the left one (with the cut end up and the attached end down towards me), wrong side up. Pin the strips together and draw a diagonal line as shown. This is (most likely) the same method you used to sew binding strips together, just a bit more smooshed. The more room you leave here between your starting and stopping point when attaching the binding, the easier it is to maneuver the strips and quilt around.

Sew on the diagonal line.

This is what it should look like. You'll want to be able to cut off that top righthand triangle, so open up the strip and check that your diagonal seam goes the right way before cutting it off.
Trim the fabric to a 1/4" from the seam.

Open it up, finger press (or use the iron) the seam open and check that it all lays flat. Finish attaching the binding on this side.

Now that you have the binding attached on one side, you can press it outwards for a nice, crisp edge, and pull it over the corners. I often just pull it over as I sew it down on the other side, but if you prefer the extra help from the iron, go ahead and press it first.

Fold the binding over to the other side of the quilt and hold about 10 inches or so in place with pins or wonder clips. You don't need to clip the entire binding, although if you feel more comfortable with it all clipped in place, there is nothing saying you can't do that. I prefer this method of attaching binding because pinning/clipping is not required :-)
Fold it over fairly loosely, you don't want to pull too hard. It just has to cover the stitching line from where you attached it to the first side and extend beyond it by a couple of millimeters.

Using your walking foot, place the binding under your foot so that the needle hits it about 1-2 mm from the folded edge of the binding (the left side in this photo). I like to move my needle over to the left as far as it goes so that my walking foot still has the entire binding underneath it and moves it nice and evenly. And it just so happens that I can align the walking foot to the edge of the quilt on the right and move the needle as far to the left as it goes and it works perfectly.
You also want to make sure your stitching is further towards the center of the quilt than the first line of stitching so you a) cover that line, and b) don't end up stitching through into the binding on the other side. You want to make sure you're stitching beside it, but as close to the edge of the binding strip as possible so you don't have a flap there.

When you get to a corner, stop about 4" away and leave the needle down. Fold your edge in as shown and pin or hold in place with clips. Pushing the fold right down with a stiletto or other pointy implement will help to make sure your corner aligns properly.
Use plenty of pins or clips in the corners, and use your stiletto to hold things in place when you have to remove the clips and your fingers get too close to the needle.

Continue stitching until you get to the corner, then stitch out towards the point, back again (in reverse, don't turn the quilt) towards the folded edge of the binding, and then keep going along the next side. This closes the opening that would otherwise be there under the fold. I sometimes prefer to just pivot in the corner and continue around the quilt, leaving the points unstitched. In those cases, I will go back afterwards and hand-stitch the opening closed with a couple of decorative stitches. Or leave it unstitched completely, depending on the intended use of the quilt.

Keep going all the way around and backstitch at the end to secure your threads.
And there you have it! You should now have a tidy little stitching line on the other side of your quilt that hopefully didn't hit the binding anywhere, and a securely folded over binding without any extra flap.

This is the best instruction I have ever had, for binding a quilt. Your explanations and graphics are outstanding.
Thank you,
Barbara