
Drawstring Gift Bag Tutorial
Here is a quick and easy tutorial to make a lined drawstring bag using a quilt block.
When I launched the Festive Forest pattern, two of my pattern testers turned their blocks into awesome little drawstring gift bags. They are super cute and a perfect little project for single quilt blocks. Whether you use them as gift bags, sewing notion storage, or to corral the Lego and wooden blocks in the toy room, they’ll make a practical and cute bag of any size.

The drawstring bag is fully lined and there are instructions for how to box the corners. Of course you can leave them pointy, too, if you prefer that look.
I’m making my bag with the small version of the Festive Forest block, which is 6.5″ x 9.5″ unfinished. If you are using a different size block, adjust your measurements accordingly.

You will need:
– 1 small Festive Forest block (6.5″ x 9.5″) (get the pattern here)
– 2 strips for the side of the block, to make it square (2″ x 9.5″ each)
– 1 bottom strip (3″ x 9.5″)
– 2 strips for the drawstring channel (2.5″ x 9.5″ each)
– 1 piece for the back of the bag (9.5″ x 12″)
– 2 lining pieces (9.5″ x 12″ each)
– 1 or 2 ribbons or strings, depending on how you like to close your drawstring bag
Cut out all your pieces and give them a good press.

Start by adding the two side pieces to each side of the block, to make it square. If you started with a square block, this would not be necessary.
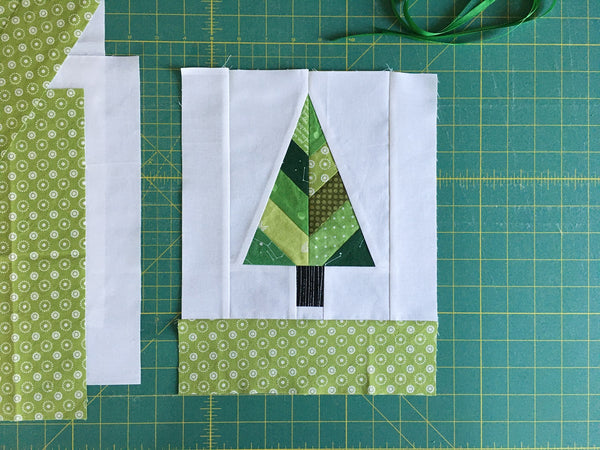
Add the bottom strip to the bottom of the block. This will be used to make the bag rectangular and to box the corners without cutting into the quilt block.

Next you need prepare the drawstring channel. On the two channel strips, fold each short end in by a generous (!) 1/4″. This is important later when you assemble the bag. You can even do 1/2″ if you want to be on the safe side. Press the fold with your iron and stitch it down about 1/8″ from the raw edge. Secure your stitches at the beginning and the end.

Fold the strips in half lengthwise and press.

Next, you will attach the channel to the top of the bag pieces.

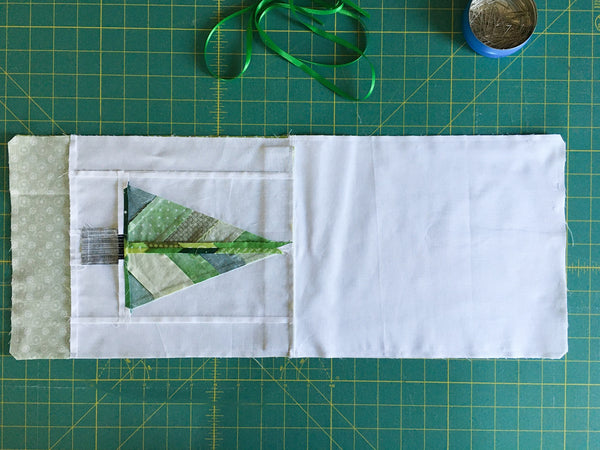
Lay one of your outside bag pieces (the block or the backing) right side up and lay one of the folded channel strips on top of it, lining up the raw edges. Make sure the strip is centered on the block piece. It will not extend all the way to the edges. Lay your lining piece on top of that, right side down and line up the top raw edge again.
Pin along the top edge, then sew it with a 1/4″ seam. Secure your stitches at the beginning and end, then press the seam towards the lining piece.

Repeat this for the second set of outside piece, channel strip and lining piece.

You will have two pieces that look like this. Notice how the drawstring channel is now securely attached to what will be the top of the bag.

Now you will start to assemble the bag. Lay one of your pieces (outside/channel/lining combination) right sides up. Place the other piece right sides down on top of it, making sure the lining pieces face each other, and the outside pieces face each other. Pin all the way around.

Secure your threads and start stitching at the bottom of the lining, going all the way around the whole bag. When you sew past the drawstring channel, slow down and make sure you’re not accidentally sewing over it. This is why you needed a generous 1/4″ fold when you prepared the channel pieces, to make sure there is enough of a gap for your seam.
Keep going all the way around until you get back to the bottom of the lining, and leave a gap for turning. Secure your stitches again, and clip the corners.
If you are going to leave the bag this way, you can skip to turning it right side out now. If you want to box the corners, keep reading right here.

Pull the fabric apart at each corner so you can lay the bottom seam on top of the side seam. Fold the seam allowances away from each other so the seams nest. Give this a press with the iron, then secure with a couple of pins so the seams don’t shift.

Measure 1″ from the point straight along the seam and mark a line across the corner. Use the markings on your ruler to make sure the line is perpendicular to the seam.
Sew along the line, securing stitches at both ends. Remove the pins.

Cut the corners off leaving a 1/4″ seam allowance. Repeat this step for all 4 bottom corners (two in the lining, two in the outside of the bag).

Turn the bag right side out through the opening in the bottom of the lining.

Fold and press the seam allowance at the opening, and stitch it closed with a 1/8″ seam.
Push the lining into the bag. You can topstitch along the top edge of the bag if you like, or just leave it as is. Thread your ribbon or string through the channel, knot the ends and you are finished!

Congratulations!
Don’t forget to tag me @pennyspoolquilts if you show off your makes on Instagram. I would love to see them!
The tree block used in this tutorial is from my Festive Forest pattern.

Can’t wait to try this for my visiting granddaughters!
Thank you x